Going upside down can be a little intimidating if you are new to yoga. In this practice, I’m going to walk you through simple yoga inversions to get used to bearing the weight of your body. Along the way, you will discover ways to balance and feel the strengthening benefits of inverting!
Yoga inversions provide amazing benefits to the body, mood, and energy. It is believed that turning your body upside down can recirculate your blood, bringing fresh and newfound energy to your cells. Whether or not that’s true, I use these poses any time I’m feeling run down, low on energy, or moody. Yoga inversions always do the trick to shift my perspective and help me feel fresh again!
But before we start, a note of caution:
Yoga inversions are not recommended for women who are currently pregnant or for women with high blood pressure. You also may want to avoid standing on your head if you have any history of neck or spine injuries. You may want to avoid standing on your hands if you have wrist, elbow or shoulder injuries. If you do not feel comfortable with the full versions of these poses, then please seek help from a certified yoga instructor before trying these on your own. Make sure to practice against a sturdy wall that is clear of any furniture or sharp objects.
If you do not feel strong or stable in the beginner poses, please do not attempt the advanced versions without help or supervision. Attempting advanced inversion variations without first developing your strength and balance can lead to injury, so please proceed with caution.
There are two ways to do yoga inversions: on your forearms and on your hands. I’ll demonstrate four beginner versions for each of these as well as some creative modifications you can use to improve your strength and balance.
Forearm Yoga Inversions
I recommend practicing forearm yoga inversions before handstand yoga inversions
Dolphin on Tip Toes | Hold 30 sec. 3X
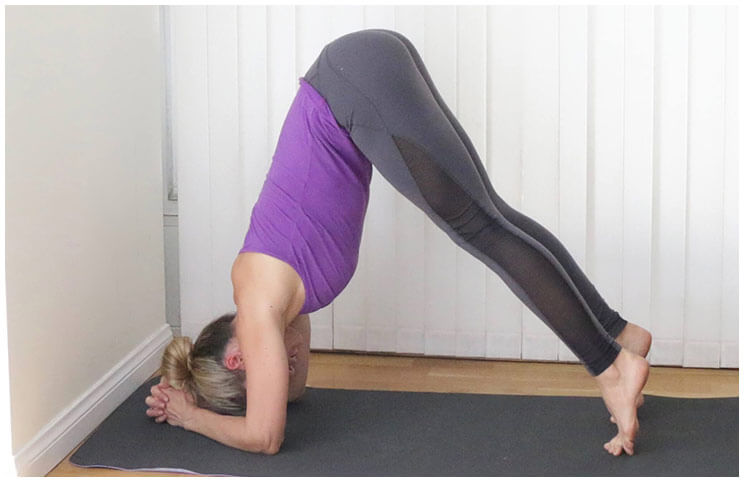
We’ll start with the Dolphin pose as it’s the safest inversion for the complete beginner. You will get the sense of being upside down and feel the weight bearing on your arms and shoulders without having to worry about balancing or holding all of your body weight.
Start by interlacing your fingers and placing your forearms down on the top of your mat with your hands about 4 inches from the wall. Your elbows should be slightly flared out to the sides, forming a triangle shape between your hands and elbows.
Lift up onto your tiptoes and walk your feet in as much as you can handle, so that you feel your weight begin to bear down on your forearms. Your head should not touch the ground in this pose. Press your forearms down harder and lift into your shoulders to elevate your head off the ground.
Shift your weight forward towards the wall as much as possible, tighten your abs, and breathe.
Beginner Tips:
This pose may look simple but it is not easy. Keep working towards the goal of aligning your hips over your shoulders.
If your hamstrings are too tight to be able to straighten your legs, it’s okay to keep a slight bend in your knees, but do not compromise your upper body position and continue to work on lifting your hips up towards the ceiling.
Breathe and maintain this pose as long as you can before needing a break. I like to hold it at least 30 seconds and up to 60 seconds, really focusing on the position of my hips. When you need to rest, lower your knees to the ground and take a child’s pose. Relax your neck and shoulders and try again when you feel ready.
I recommend repeating this pose three times in a row so you can really work on your alignment and strength.
Recommended practice: Hold pose 30 seconds per set. Repeat up to 3 times. Rest approximately 30-60 seconds between sets.
Single Leg Lift-Offs | Hold 30 sec, alt sides. 3X
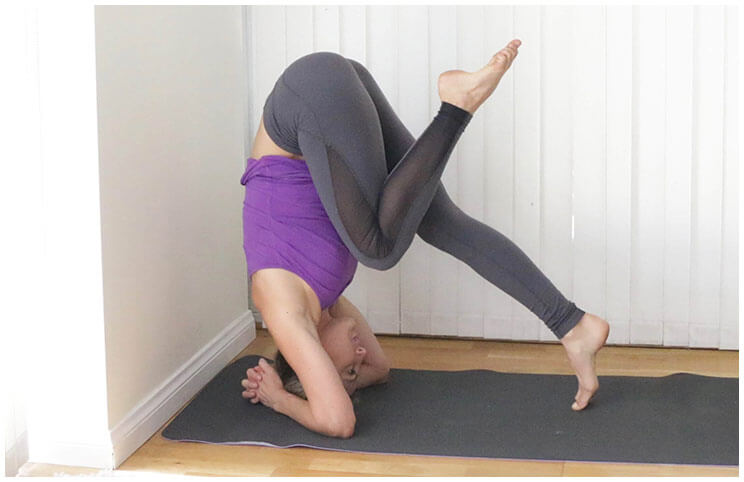
If you are feeling confident with your Dolphin pose and ready for the next level, it’s time to try single leg lift-offs. This exercise will emphasize the feeling of fully bearing your weight while still keeping some touch on the ground to stabilize.
In this pose you will place the top of your head on the mat, but I want you to maintain that same push and lift of your shoulders as a way of protecting your neck from taking all the weight of your body. You should still feel the majority of the pressure on your forearms, and not on your head. Placing your head down assists with balance, but bearing all of your body weight on your head is dangerous for the neck and spine.
Once you’ve established a comfortable position with your head and shoulders, you can experiment with lifting one foot off the floor, then placing it back down and lifting the other foot. Bring the knee of the lifted foot close to your chest so that you can feel the weight of it.
Beginner Tips:
I like to play around with switching sides quickly and holding each side for just a few seconds. Try alternating sides back and forth while holding the position for about 30 seconds.
Recommended practice: Hold pose for about 30 seconds while alternating lifting one foot for about 3 seconds per side. Repeat up to 3 times or until you feel confident with this pose.
Headstand Tuck | Hold 30 sec. 3X
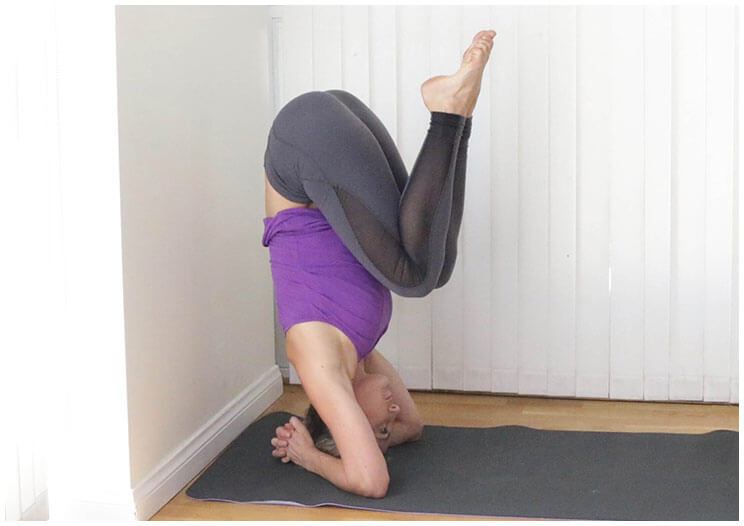
Ready to bear all the weight of your body and practice your balance? It’s time for the Headstand Tuck.
Get back into the same position as before, with your hands interlaced and about 4 inches from the wall. You can go even closer to the wall if you are worried about falling backwards (the wall will be there to stop you).
Press down hard into the ground with your forearms so that your shoulders are engaged and lifted. You should feel some pressure on the top of your head, but the majority of the pressure should be on your forearms.
Lift one foot off the ground, tucking the knee close to your body, and then gently lift the other, bringing your knees together close to your chest. Point your toes and hold your balance. Continue to breathe in a relaxed manner, taking deep inhalations and slowly exhaling all of the air from your lungs.
Test yourself to see how long you can hold the position.
Beginner Tips:
Make sure to keep your core tight and keep lifting your hips towards the ceiling. This is not a passive pose. You should be actively working to lift and tighten your core to maintain your balance. I like to hold as long as I can and work on clearing the space in my mind. Sort of like an active meditation, I focus on letting go of stressful thoughts and welcoming in peace and serenity.
Recommended: Hold this balance as long as you can or for 30 seconds. Focus on stability and core strength. Repeat up to 3 times or until you feel confident with this pose.
Toe-to-Wall Headstand | Hold 30 sec, alt sides. 3X
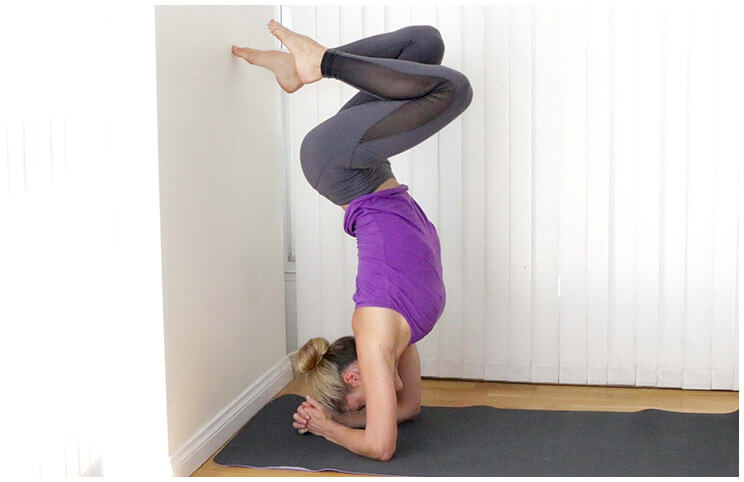
Now that you’ve got the balance part down, it’s time to experiment with unfolding. In this toe-to-wall variation, we’ll try balancing while extending half way up, but without worrying about going all the way up into headstand.
Resume the same starting position from the last pose and lift up into your tuck position. Lift your knees up towards the ceiling and your hips back towards the wall. Gently touch your toes to the wall with one or both feet and begin to adjust yourself to feel balanced.
Experiment with removing your toe touch from the wall to see if you can balance, but stay close to the wall to catch yourself if you need to.
Alternate feet to touch the wall, holding this pose as long as you feel comfortable.
Rest when you need to take a break, then try again.
Recommended practice: Do this 3 times, holding 30 seconds each time, alternating which foot touches the wall. Try to balance as long as you can, and use the light toe touch only when you need it to rebalance yourself.
Wall Headstand | Hold 5-10 sec. 3X
Time to take it up a notch. Start in the same position as the previous poses.
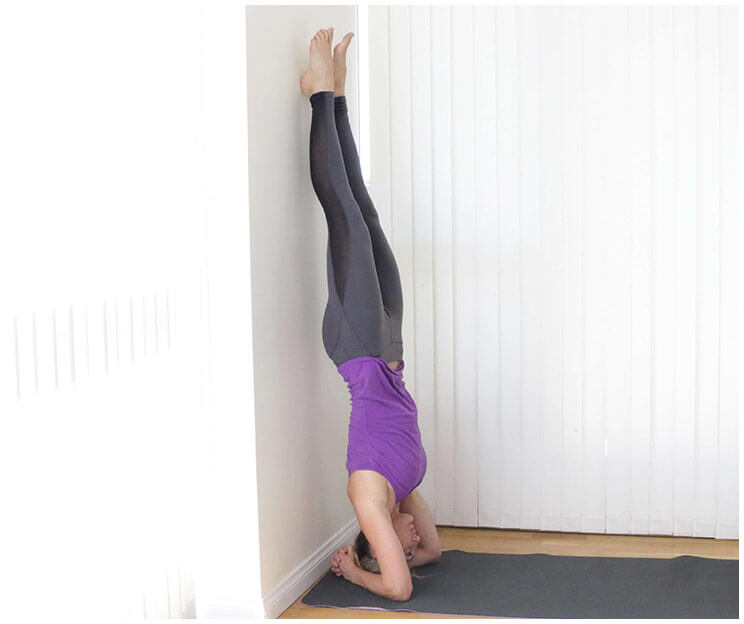
Step forward as far as you can to bear most of your weight on your forearms. Carefully kick one leg up all the way to the wall and follow with the other leg so that your heels meet against the wall. Aim to align your hips directly over your shoulders and keep your core tight. Never stop pressing down into the ground, elongating your shoulders and lifting your hips upward. Now that you are bearing your entire bodyweight, this lifting action is more important than ever.
Keep your butt and legs active and flexed. Breathe normally—do not hold your breath.
Recommended practice: Your first time trying this, hold it only for 5 to 10 seconds, then increase the duration as you become more comfortable and confident at bearing your whole body weight. Repeat at least 3 times to help you build strength and gain confidence.
Straight Arm Yoga Inversions
I recommend these straight arm (handstand) yoga inversions as an advanced practice after becoming comfortable with the forearm yoga inversions.
Tiptoe Forward Fold | Hold 30 sec. 3X
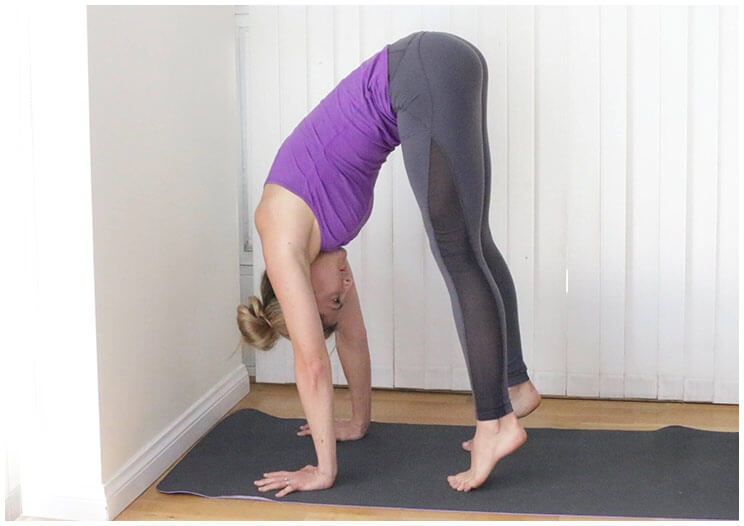
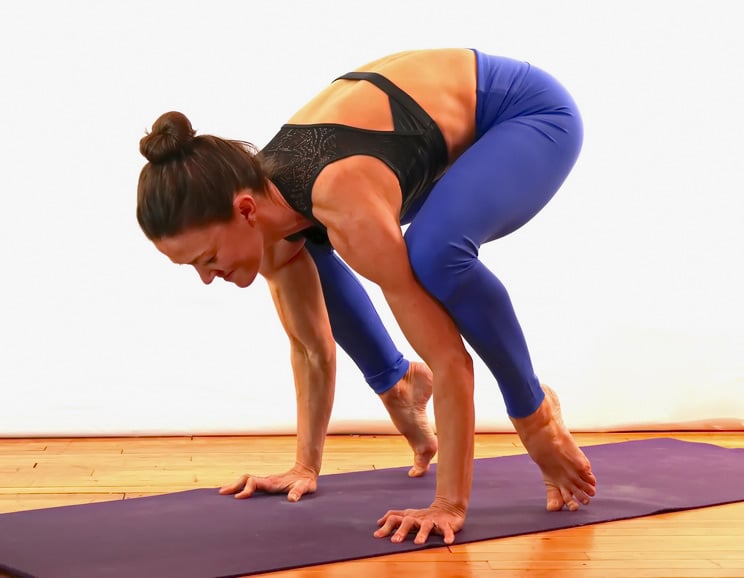
The first step to handstands is to learn to bear pressure on your palms and wrists and to keep your arms strong and straight under pressure. This forward fold on tiptoes helps you safely train your hand placement and arm alignment.
Start by placing your hands on the ground, shoulder-width apart. Spread your fingers wide to maximize the surface area of your hands. Your fingertips should be actively pressing into the ground.
Lift up on your tiptoes and lean forward to put as much pressure as possible onto your hands. Make sure the palms of your hands do not lift off the ground. Press evenly into the floor with your palms and fingertips.
Hold this pose and continue pressing into the ground and work on straightening your arms fully. Lift your hips up as high as you can.
Recommended practice: Hold this pose for at least 30 seconds. Rest when needed. Repeat at least 3 times.
Chair Assist Handstand | Hold 30 sec. 3X
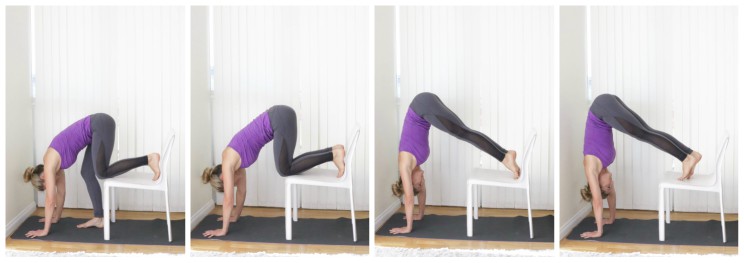
A chair can help you get closer to the feeling of holding your weight on your hands without having to kick up or worry about balancing. I recommend doing this with your back close to the wall just in case you tip backwards, as the wall will be there to catch you.
To start, place a sturdy and stable chair, facing the wall, about three feet away from the wall. Place your hands about 4 to 6 inches away from the wall. Spread your fingers and press your palms and fingertips evenly into the ground. Bend one knee and step onto the chair. With both knees and feet on the chair, you can start to get the feeling of bearing your weight on your hands.
Next straighten your knees and lift your hips up over your shoulders so that your torso forms a straight line over your hands. Tiptoe your feet forward to further align your hips over your hands and shoulders.
Only go as far as you feel comfortable and bend your knees to come down whenever you need a rest.
Recommended practice: Hold this posture for at least 30 seconds. Continue to breathe deeply and focus on lifting your hips up high and holding them directly over your shoulders. Repeat this at least 3 times to build your arm and core strength.
L-Shaped Handstand | Hold 30 sec. 3X
For this pose, we’ll take a different starting position. We’re going to use the wall in a new way as a tool to stabilize while balancing.
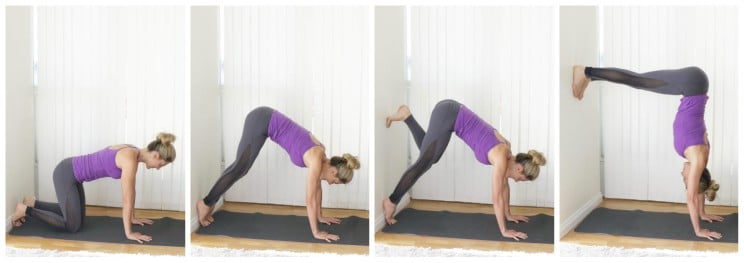
Start in an all-fours position with your toes touching the base of the wall. If you align your shoulders over your wrists and your hips over your knees, this is generally the correct distance for your L-shape. Make sure your hands are shoulder-width apart and your fingers are spread wide apart.
Straighten your knees and lift your hips. Begin to climb up the wall by pressing into it with one foot at a time walking up about 3 to 4 feet off the ground, or until your body forms an upside down L-shape.
If your hands are not directly under your hips, you may adjust by walking your hands a little bit forward or backwards. Focus on the alignment of your shoulders and hips. Tighten your core and breathe deeply.
Recommended practice: Hold this pose for about 30 seconds. Repeat at least 3 times to build arm and core strength and stability.
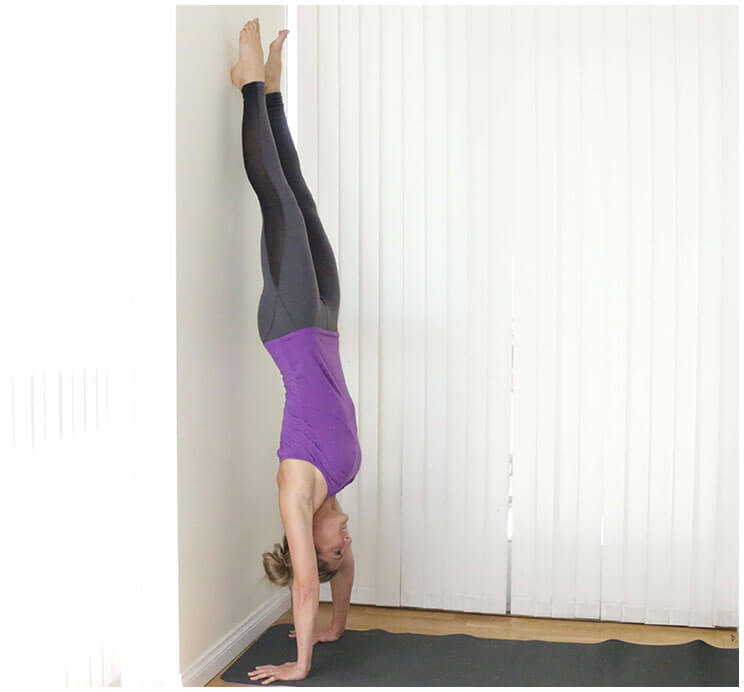
Handstand Against the Wall | Hold 10-30 sec. 3X
Handstands against the wall is a very good training pose to eventually master freestanding handstands. Be careful not to lean too much of your weight on the wall, but rather use it as a support tool to help you balance. Your weight and center of gravity should still be directly over your hands, which should be in alignment with your shoulders and your hips.
Start by placing your hands about 4 inches from the wall. Spread your fingers to create a wide base of support. Walk your toes towards you as much as you can to lean most of your bodyweight onto your hands and arms. Keeping your elbows stiff and strong, your shoulders lifted and your hips elevated, kick up towards the wall to lightly touch your heels to the wall. Once you are up, work on creating a tight and stable core by flexing all of your core muscles. Pull your rib cage back to prevent sagging in the middle.
Look straight ahead or slightly down to keep your spine in alignment (rather than looking straight down at the floor, which may pinch your neck.)
Continue to lift up with your legs and press down into the floor with your palms and fingertips.
Do not hold your breath; continue to breathe deeply throughout the hold.
Gently lower one leg towards the floor and come down with control.
Recommended practice: Hold this pose for 10-30 seconds at a time. Rest when needed. Repeat at least 3 times to strengthen your arms and core and work on your balance and stability.
Final Tips
You are welcome to use all of these beginner inversion poses in one day, or choose those that best suit your current level and work on them one at a time.
Keep in mind that mastering yoga inversions takes time, patience and repetition. If you do not feel confident with these poses right away, stick with the first level of beginner forearm variations and continue to work on those postures until you feel comfortable and confident enough to move forward. Rushing yourself and jumping ahead to postures you are not ready for can do more harm than good. Have patience and tolerance for yourself as you learn to progress safely.
(Your Next Workout: How to Do a Pull-Up)



 Crockpot Chicken and Cauliflower Rice Soup
Show Comments