Whether you are new to yoga or have years of experience under your belt, there is always room for growth. Watching your flexibility and strength increase is an amazing benefit of yoga that can keep you coming back for more, and these yoga modifications will help you make the transition that much easier.
If you are looking to develop an advanced asana practice (physical practice), the best place to start is with the basics. Increasing your yoga practice from assisted poses to advanced poses can be really exciting, but before attempting any advanced poses, here are three main points to hit:
Warm-up
Before practicing any advanced yoga poses, it is important to be warm! Making sure the proper muscles for each pose are warmed up helps prevent injuries. Each pose has specific muscle groups that need to be lengthened (stretched) and specific muscle groups that need to be strengthened before attempting the pose.
Looking for an easy way to get started working out?
Grab our FREE Beginners Workout Guide - 3 Weeks To Tighter Abs, Sculpted Arms, And Toned Legs, by clicking here!
Breath awareness
Developing proper breath awareness is key before attempting any advanced yoga poses. Learning to use your breath properly allows you to go deeper into a pose and keep your core engaged (which will protect your spine from injury).Begin practicing your Ujjayi (“victorious”) breath throughout your yoga practice. This breath sounds like an ocean wave and helps to warm your body from the inside out. This pranayama (breathing) technique increases concentration and helps to release tension in tight areas of the body.
To practice this Ujjayi breath: Seal your lips closed and place the tip of your tongue on the roof of your mouth. When you do this, you should feel a slight constriction in the back of your throat. Begin to breathe slowly in and out of the nose. Your breathing should feel textured and your exhales should be audible.An important thing to remember is that you should always be able to keep your breath. If you lose your breath or start to strain, it is a sign to back out of the pose until you can find that balance between effort and ease!
Body awareness
Making sure that you develop body awareness before practicing advanced poses is important. Knowing the difference between stretching and straining can be a fine line, and being aware of your body’s limits is crucial. Starting with a basic physical yoga modifications and practicing assisted poses is a great way to get in tune with your body.Two of the most important things to remember when trying to get into more advanced poses is to practice patience and kindness towards yourself. Achieving advanced poses can take time, sometimes a lot more time than we would like. Some days we feel super flexible and strong and some days we don’t. Remembering that each day is different and loving our bodies regardless is one of the most important lessons of our yoga practice.
10 Assisted vs. Advanced Yoga Modifications
- All you need for these yoga modifications is two yoga blocks and a strap.
- Hold each pose for either 8 breaths or 8 breaths per side.
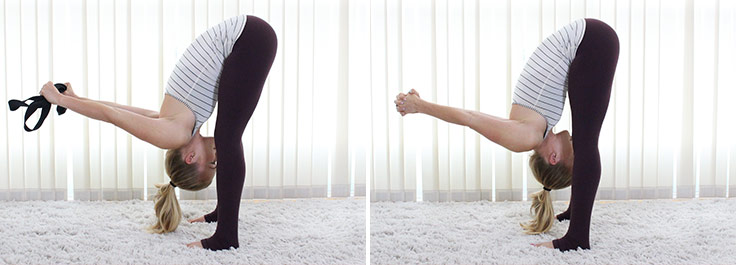
Bound Forward Fold
This pose is a shoulder, hamstring, and low back opener.
Assisted
- Begin standing with feet hip-width apart and hold strap in one hand. Take both hands behind your back, palms facing away from body, and grab the strap with your other hand so you are holding it in both hands. Bring the hands as close together as feels comfortable.
- Inhale to bring a small bend into knees and take an exhale to begin to fold upper body over your thighs. Keeping the strap in both hands, allow the hands to fall over the head. Make sure knees are bent so that belly is resting on thighs. Allow weight to shift towards the balls of feet.
- Use each inhale to find a bit of length in spine by lifting chest slightly. With each exhale, pull belly in towards your spine and fold a little deeper. Hold for 8 breaths, then slowly stand up and release the strap.
Advanced
- Begin standing up with feet hip-width distance. Interlace hands behind back and try to pull heels of palms together to touch. If they don’t touch, it is OK.
- Continue just like you did with the strap. Exhaling to fold forward while keeping fingers interlaced. Use breath to find depth in the pose. Hold for 8 breaths, then slowly stand up and release your hands.
Bound Locust Pose
This pose opens up the shoulders and strengthens the back muscles.
Assisted
- Start on belly with legs out long, toes untucked. Place forehead on the ground. Hold strap in one hand. Take both hands behind your back, grabbing strap with the other hand. Walk both hands as close together as you can on the strap. Zip your legs up and squeeze your thighs together.
- Exhale all of the breath out of your lungs. Inhale and begin to lift chest, legs, and feet off of the ground. Keep your gaze down so that neck is long. Lift hands and strap away from body. Continue squeezing thighs and try to reach back through toes.
- With each inhale, use strength of your back to lift chest a little higher. With each exhale, try to squeeze thighs together a bit more. Hold for 8 breaths.
- Exhale to lower chest and legs back down. Take one cheek to the floor, release the strap off to the side, and let body relax.
Advanced
- Start on your belly with legs out long, toes untucked. Place forehead on the ground. Interlace hands behind low back and try to pull heels of your palms together. If they don’t touch, it is OK.
- Continue just like you did with the strap. Keep hands interlaced as you inhale to lift up. Keep the hands lifting up and back the whole time. Hold for 8 breaths.
- Exhale to lower down and let your hands go down alongside your body. Take one cheek to the floor and let your body relax.
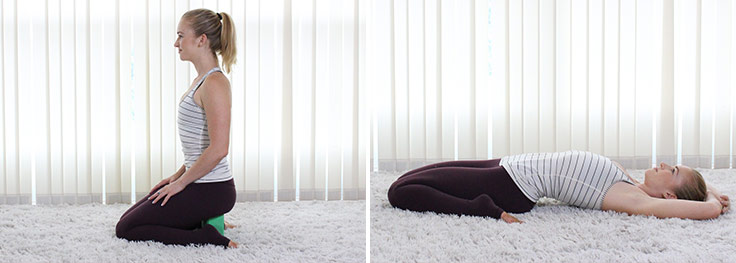
Hero’s Pose
This pose is great for opening up the quadriceps and the hip flexors. This pose is not recommended for those with knee pain. If you feel any pain in this pose, please come out of it and skip the pose.
Assisted
- Start in a tabletop position with knees together and your feet wider than hip-width. Take a block and place the block between the feet. You can use the block on either the widest or shortest side, depending on what feels comfortable for you.
- Start to walk hands back and lower hips onto the block. Lift chest so you are sitting on the block and place hands on your thighs. Close your eyes and take 8 deep breaths.
- To come out of it, place hands on the ground and walk back out to a tabletop position.
Advanced
- Start in a tabletop position with knees together and your feet wider than hip-width. Walk your hands back and lower your hips to sit between your feet. Lift your chest up and place your hands on your thighs.
- If this feels good and you want to feel even more of a stretch, take your hands behind you and start to walk them back until you lower down to your forearms. You can stay here or if you want to go even further, you can gently lower down to your upper back. Once you are comfortably resting on your back, you can take your arms above your head, bend your arms, and take each hand to hold on to the opposite elbow. Hold here for 8 breaths.
- To come out of this, walk your hands next to you and come back to your forearms. From your forearms, press into your hands and then walk your hands out in front of you. Crawl up to a tabletop position to release.
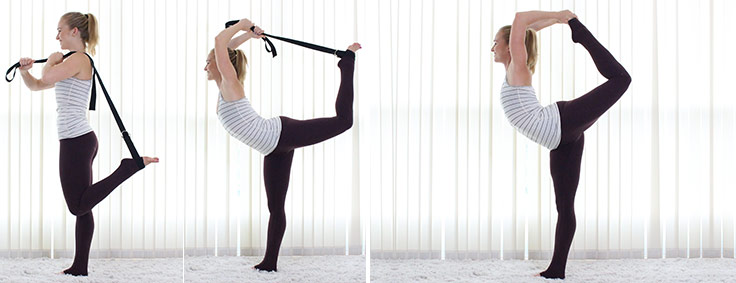
Dancers
This challenging balancing pose opens up the chest and hamstrings while strengthening the core.
Assisted
- Make a small loop in strap. Stand with feet together and hold the strap in left hand.
- Find a gaze point in front of you to look at the entire time. Keep a microbend in right knee and shift the weight onto right foot. Pick left foot up off of the ground, bend left knee, and loop the strap around left foot. Stand up tall and squeeze thighs together. Backpack the strap up and over left shoulder.
- Keep core engaged to stay balanced. Begin to reach strap above your head, grabbing it with both hands. Take an inhale to stand tall, then exhale to kick left foot back into the strap as you keep chest lifted. Hold for 8 breaths.
- To release, lift chest up and bring left leg forward to gently release the strap from your foot. Put your left foot on the ground and shake out your legs. Switch sides.
Advanced
Note: This variation requires a lot of back, shoulder, and abdominal flexibility, and also requires you to be able to “flip your grip” as you bring the foot up behind your head.
- Stand with feet together. Shift weight into right foot and lift left foot off the ground. Take your left arm down alongside your body and turn palm out so that thumb is pointing back.
- Take hand outside of left foot and rotate the hand out so that you can grab the outside of your toes. Find your gaze point and engage core the entire time.
- Inhale and pull left foot towards the back of your head while trying to keep chest lifted. Flip your grip by keeping ahold of the toes and rotating your shoulder so that the left elbow points up.
- Reach right arm up and back, bending the elbow and grabbing left wrist. Breathe deeply and keep core engaged. Hold for 8 breaths, then slowly release your foot and stand back up. Switch sides.
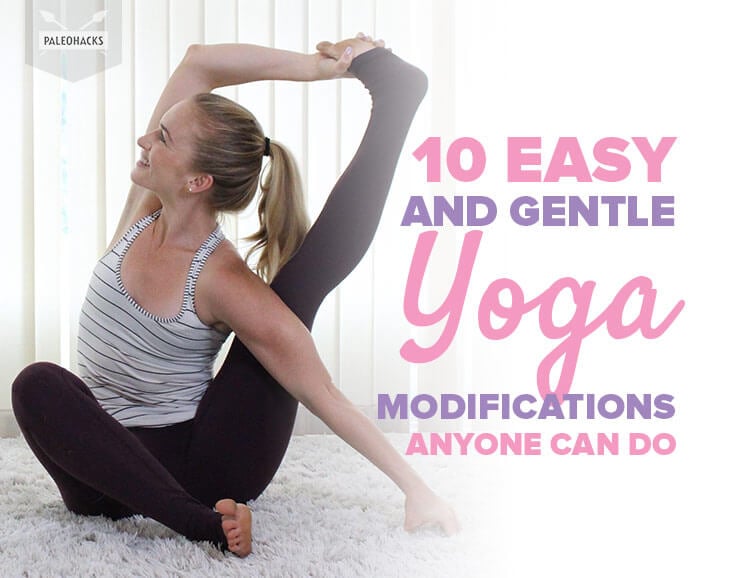
Compass
This pose requires hamstring, lat, and hip flexibility.
Assisted
- Start sitting on the ground cross-legged with strap off to one side. Make sure there is a loop in strap that your foot will fit into.
- Keep left leg in the crossed position, pick right leg up and backpack it over right shoulder. The higher you can get the thigh over your shoulder, the easier it will be to get into the pose. If your leg doesn’t get up near your shoulder, continue to practice opening up your hips before you go further in this pose.
- If you are ready to continue, keep right leg over right shoulder, take loop in strap and loop it over right foot. Hold strap in left hand and place right hand on the floor outside of right hip.
- Straighten out right arm so that it presses right thigh open. Holding strap, lift left hand out above head and straighten arm. Inhale and begin to straighten out left leg as much as you can while keeping chest lifted and maintaining breath. Hold for 8 breaths and then gently release to switch sides.
Tip: If you want to go further into the pose, walk your left hand closer to your foot on the strap. You can also play around with taking your gaze up and under your left armpit.
Advanced
- Start sitting on the ground cross-legged. Backpack right thigh over right shoulder.
- Place right hand on the ground to press thigh open. Grab right foot with left hand. Keep left arm straight and straighten out right leg.
- Keep spine long and chest lifted the entire time to keep low back from rounding. Hold for 8 breaths and then gently release to switch sides.
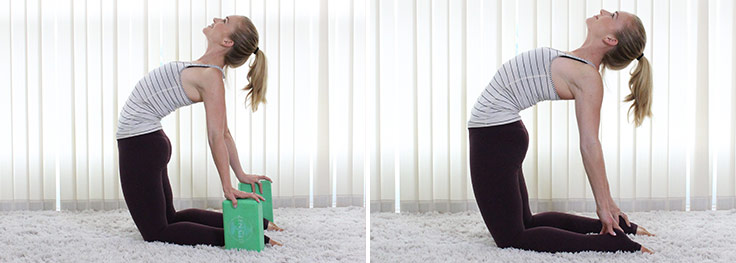
Camel
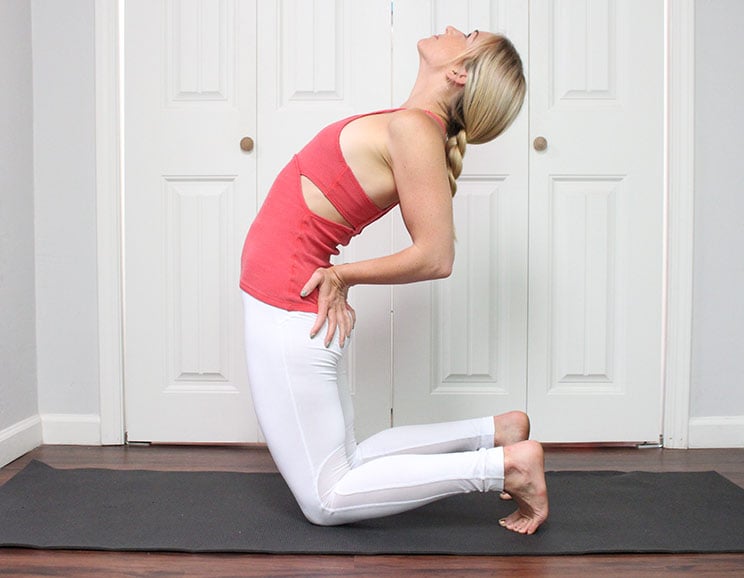
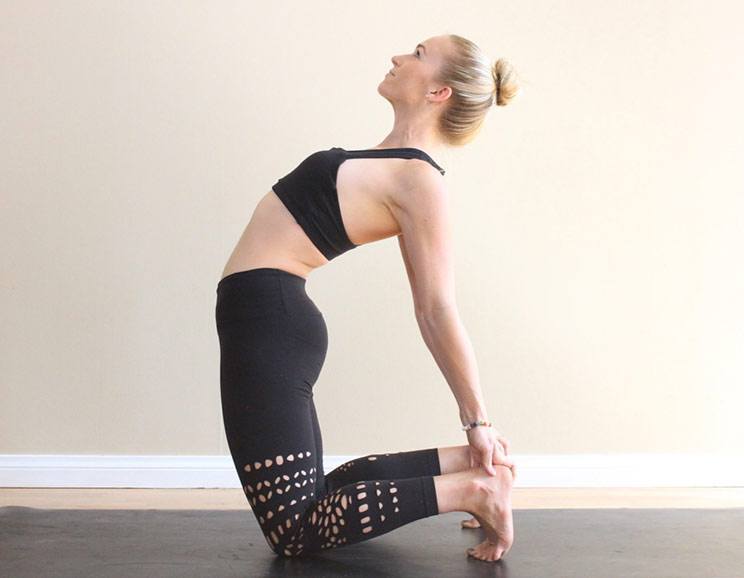
This pose requires opening through the back, belly, and shoulders. While it stretches your belly, you need to engage your abs the entire time to protect your lower back from injury.
Assisted
- Kneel down with knees hip-width distance. Place blocks on either side of ankles (either on the widest or shortest side, whichever is comfortable). Take hands onto low back with fingertips pointing down. Squeeze shoulder blades and thighs towards one another. Engage low belly and lift heart towards the ceiling.
- Try to keep hips stacked over knees the entire time. Inhale, lift chest and press hands down against low back as you take your gaze up to the sky. Keep a slight tuck of your chin as you make your way into a backbend.
- Take right hand off the low back and place on the block next to right ankle. Then take left hand off the low back and place it on the other block. With each inhale, fill up belly and lift chest higher. With each exhale, pull belly in tight to keep abs engaged. Hold for 8 breaths.
- Take right hand to low back, followed by left hand. Use the strength of your abs to lift chest over hips. Bring legs together and sit back on heels for a few breaths.
Advanced
- Kneel down with knees hip-width distance. Take hands to low back and tuck toes.
- Engage abs and press down against low back as you inhale and lift chest. Walk gaze along the ceiling moving into a backbend.
- Take right hand to right heel and then left hand to left heel. Keep breath strong, belly engaged, and keep a slight tuck of your chin. Hold for 8 breaths.
- Take right hand to low back and repeat on left side. Use the strength of your abs to lift chest over hips. Bring legs together and sit back on heels.
Tip: If you feel open in the advanced version and want to take it deeper, you can untuck your toes.
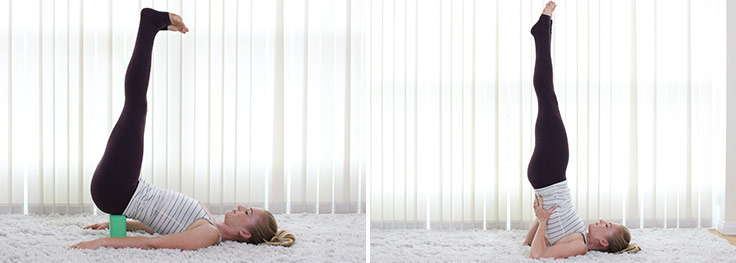
Shoulder Stand
This challenging inversion boosts metabolism, blood flow to the brain, and energy. It requires strength through the upper arms, shoulders, and core.
For both the assisted and advanced variations of this pose, make sure to keep your neck straight the entire time to prevent injury. Keep your neck long and gaze towards your legs, keeping your head straight.
Assisted
- Lie on back with knees bent and feet planted on the ground. Take your hands alongside your body.
- Pressing into your palms, lift your hips up towards the ceiling and slide a block underneath your sacrum (either on widest or shortest side, whichever is most comfortable). Lower your hips to rest on the block.
- Draw knees in towards chest to lift feet off of the ground. Straighten legs in the air, reaching feet towards the ceiling. Engage thighs and flex feet. Hold for 8 breaths.
- Lower feet back to the ground, lift hips, and remove block.
Advanced
- Lie on back with knees bent and feet planted on the ground. Take your hands alongside your body.
- Press hands and arms into the ground as you use the strength of your abs to lift legs straight up towards the ceiling. Bend elbows and place hands on low back to create a shelf.
- Keep weight out of your neck by pushing upper arms down against the floor and reaching up through toes. Keep abs engaged the entire time. Hold for 8 breaths.
- Bend knees and use hands to slowly roll down one vertebra at a time.
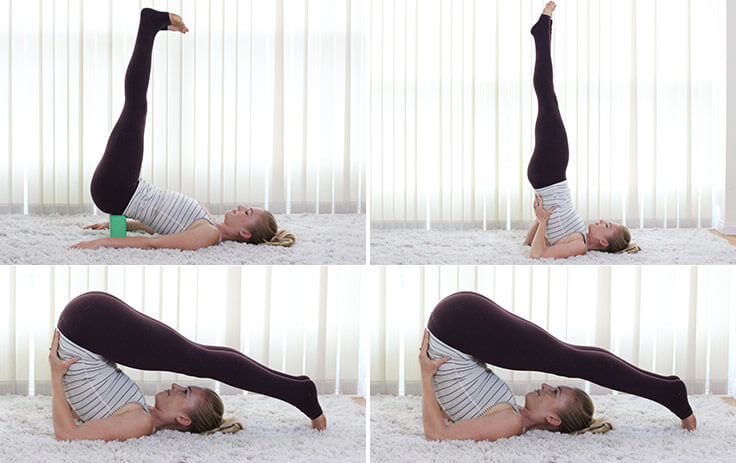
Plow
This pose has many of the same benefits as the Shoulder Stand. An added bonus of the advanced variation of Plow pose is that it helps to lengthen out the spine. It is a great counter pose for backbends such as Camel Pose.
Assisted
- For the assisted version of Plow pose, follow Step 1-2 of the Assisted Shoulder Stand (above). Then continue to Step 2 of the Advanced version of Plow pose below.
Advanced
- Start in the advanced Shoulder Stand position with feet lifted towards the ceiling and hands supporting lower back.
- Keep abs engaged and squeeze thighs together as you slowly lower toes towards the floor behind your head. Keep gaze up at legs while in this pose and do not turn head side to side. If your toes don’t touch the floor behind your head, it is OK. Make sure to keep hands on lower back for support. Hold for 8 breaths.
- Use hands as brakes to slowly roll back down, one vertebra at a time.
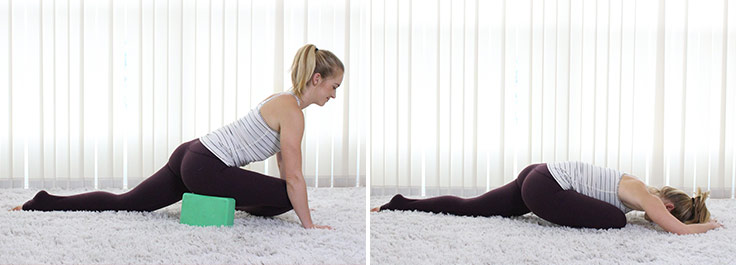
Pigeon
This pose is an essential hip opener in any yoga practice.
Assisted
- Begin in a tabletop position. Bend right knee and line knee up with right wrist. Draw right foot over towards the left side of your body and flex foot.
- Press into hands to lift hips and straighten left leg back behind you with toes untucked.
- Place a block underneath right hip (either widest or shortest side of block), then square hips and shoulders forward. Inhale to lift chest. Exhale to walk hands out in front. You can stay on your hands or deepen the stretch by lowering down to forearms. Hold for 8 breaths then switch sides.
Advanced
- Begin in the same position as you did for the assisted variation. This time, don’t use a block so that the hips can sink closer to the ground and achieve a deeper stretch.
- Square hips and shoulders forward and on an exhale, walk hands out in front of you. Lower to your elbows (or for the deepest stretch, lower all the way to your forehead with your arms out in front of you). Hold for 8 breaths, then switch sides.
Tip: If you experience any knee pain, come out of the pose and switch to this supine variation: Lie on back with knees bent and feet on the ground. Pick up right leg and cross right ankle over left thigh. Press right thigh open with right hand to feel the stretch through hip. Hold for 8 breaths and then switch sides.
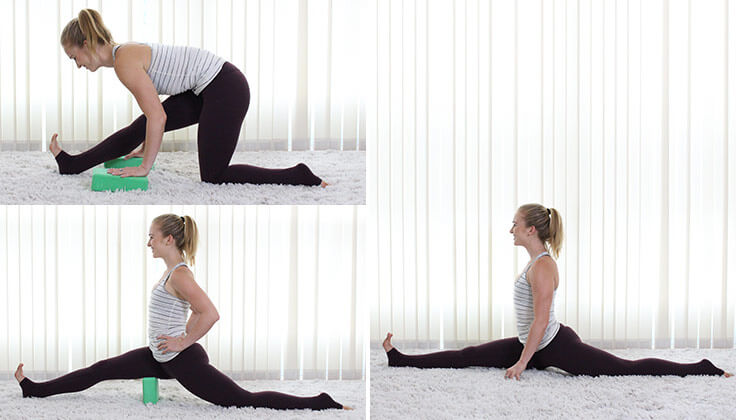
Full Splits
This pose requires flexibility in your hamstrings and hip flexors.
Assisted
- Begin in a low lunge position with right foot forward. Take hands down to frame right foot and place blocks underneath hands.
- Straighten out right leg as you inhale and walk hands with the blocks back a few inches. Back toes can either be tucked or untucked.
- Once right leg is straight, exhale to fold chest towards leg. Flex right toes back towards you. Keep slight engagement through right quadriceps and hold for 8 breaths, then switch sides.
Advanced
- Begin in a low lunge position with one block off to the side. Place hands on the ground to frame right foot. Pressing weight into your hands, begin to slide right foot forward, bringing you towards a full split position.
- Keep hips square and place a block underneath right upper thigh. Keep slight engagement in quadriceps and flex right toes back. Engage core and keep hands on the ground or place them on hips with a lifted chest.
- If you feel like you can go further, remove the block and allow your hips to sink all the way towards the ground. Hold for 8 breaths and switch sides.
(Your Next Workout: 9 Yoga Inversions to Help You Nail a Handstand)





 Grilled Hawaiian Pineapple Chicken

Show Comments