Fitness doesn’t have to be complicated. In fact, sculpting a kickass body is easier than you think. Bodyweight training requires zero equipment and minimal space. To make things even easier, we’ve put together 10 classic bodyweight exercises broken down by three different fitness levels (ranging from easy to advanced).
Bodyweight training is an extremely simple, effective way to get in shape. Without the need for fancy equipment, complicated exercises, or much space, it becomes easy to do a full-body, fat-blasting workout.
That being said, sometimes it’s difficult to know which bodyweight exercises you should be doing (or how to modify them to best suit your body and fitness level). In this article, I’ll teach you 10 highly effective bodyweight exercises, and I’ll show you how to increase or decrease the challenge of these classic moves.
Let’s dive in!
Looking for an easy way to get started working out? Grab our FREE Beginners Workout Guide – 3 Weeks To Tighter Abs, Sculpted Arms, And Toned Legs, by clicking here!
Classic Squat Jump | Goal: 15 reps per set
Benefits of Squat Jumps
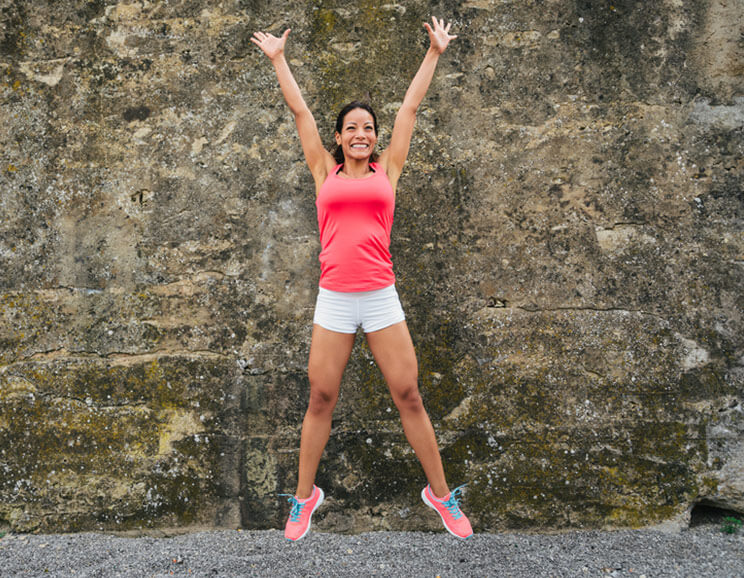
Squat jumps are among the best plyometric bodyweight exercises. They spike your heart rate, tone your legs (from hips to ankles), and give the core a good workout. Studies also show that incorporating the squat jump into a training program can lead to gains of strength and power in participants (1).
Another benefit to the squat jump (that you might not have considered) is how it improves digestion and elimination. The squat position aligns the intestinal tract in a way that causes waste to move downwards, and it creates intra-abdominal pressure. These two factors make it much easier to have healthy bowel movements.
The most common mistakes include poor posture, leaning forward, decreased range of motion, and incorrect landing.
It’s incredibly important to correctly perform the jump squat. Here’s how:
- To focus on correct form, decrease the number of overall repetitions.
- At the top of the jump, the hip crease should open, the pelvis slightly pressed forward, the abdominals braced, the back straight up-and-down, and the head directly above the spine.
- At the bottom of the squat, the feet are as close to parallel as possible, the heels are flat on the ground, and the hips are slightly below 90º (if possible).
- Try to work through a full range of motion each time. A deep squat recruits more muscles in the gluteals and hamstrings, and can make for healthier ligaments (2).
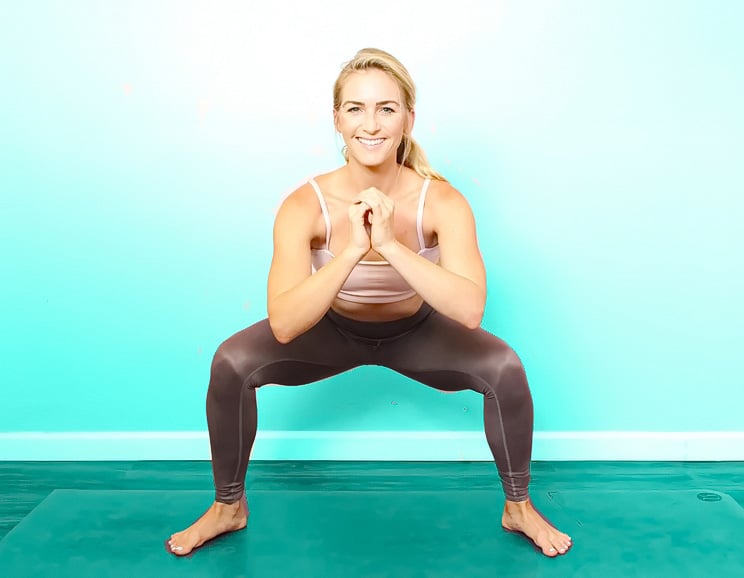
Squat Releve | Easy

Start standing with the feet almost parallel under the hips. Bend the knees into a deep squat before energetically standing up and lifting your heels away from the ground. Lower the heels as you sink down into another squat.
Squat Jump | Medium
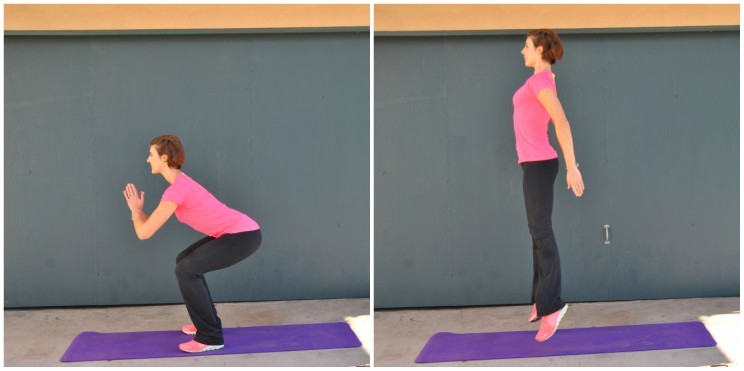
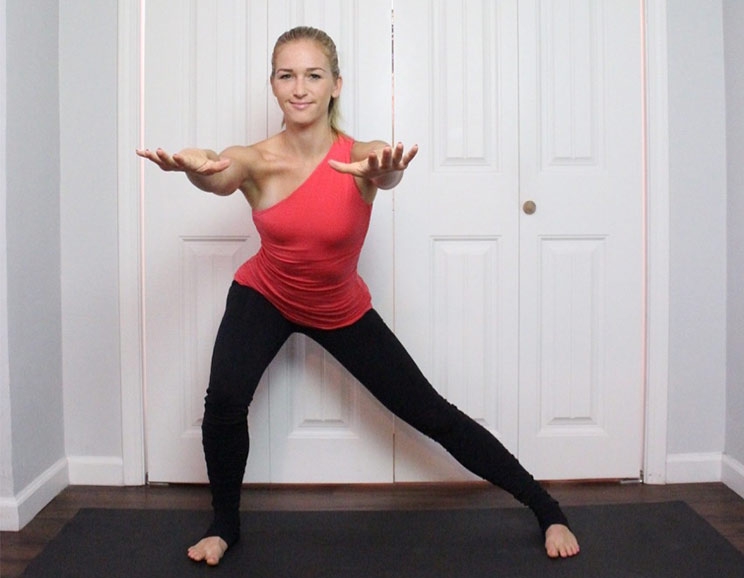
Start standing with the feet almost parallel under the hips. (The toes may need to turn out slightly.) Before springing up away from the ground in a jump, bend the knees into a deep squat. Land back in the squat with bent knees.
Broad Jump | Hard

Start standing with the feet almost parallel under the hips. (The toes may need to turn out slightly.) Bend the knees into a deep squat, sit the hips back and down, and reach your arms behind you. Jump up and forward, sweep the arms in front of the body, and land (with bent knees and the weight in the heel of the foot). Continue to move forward with each jump.
The Walking Lunge | Goal: 30 reps per set
Benefit of Walking Lunges
Walking lunges strengthen the legs, thighs, and hips. They also act as a dynamic stretch for the quadriceps and hip flexors. So this 2-for-1 movement should be included in your workout routine AND your warm-up. Besides toning and stretching your legs, walking lunges also challenge (and improve) balance and ankle stability.
The Love-Hate Relationship of Lunging
Walking lunges can be challenging for people who have tight knees, weak thighs, or gluteus muscles. But they’re an exercise worth learning. For a “knee friendly” option, start with the regression below. This move keeps the bodyweight moving back and engaging the hamstrings and glutes (more than the fronts of the thighs).
Technique Tips
Keep an erect spine, a 90º bend in both knees (in the bottom phase of the movement), engaged abdominals, and relaxed shoulders throughout. Advance with the jump lunge only once. 30 repetitions of walking lunges can be correctly performed.
Note: If you do experience tight thighs and knee tension, consider doing myofascial release by using a foam roller before performing lunges.
Back Lunge | Easy
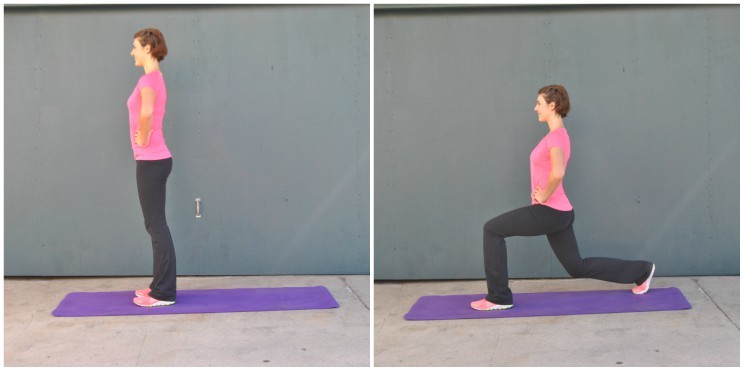
Start standing with the feet side-by-side. Take a step BACK with the RIGHT foot, and bend both knees to 90º. Then step the RIGHT foot back up to meet the left. Next, take a big step back with the LEFT foot. Last, step the LEFT foot back to the starting position.
Walking Lunge | Medium

Start standing with the feet side-by-side. Take a big step FORWARD with the RIGHT foot (bending both knees to 90º). Step the LEFT foot up to meet the right. Take a big step forward with the LEFT foot. Step the right foot up to meet the left.
Jump Lunge | Hard

Start in your lunge position, with both knees bent at 90º. Jump up away from the floor, switch feet midair, and land back in your lunge (with the opposite foot in front).
Single Leg Pelvic Press | Goal: 12 reps per set
Benefit of the Pelvic Press
Very few bodyweight exercises isolate your backside, hamstrings, and pelvic press. In addition to strengthening the legs, the pelvic press also helps stabilize your hips, waist, and low back. And it stretches your abdominals and psoas muscles. While this is a great exercise for everyone, it’s particularly beneficial for people who experience piriformis syndrome (aka false sciatica) and have knee sensitivities (that eliminate the ability to do squats or lunges).
Technique Tips
In the variations below, the back stays flat, and the pelvis and spine lift and lower together. For neck safety, keep your eyes up to the ceiling at all times. Bear the upper-body weight in the back of the shoulders, not the neck.
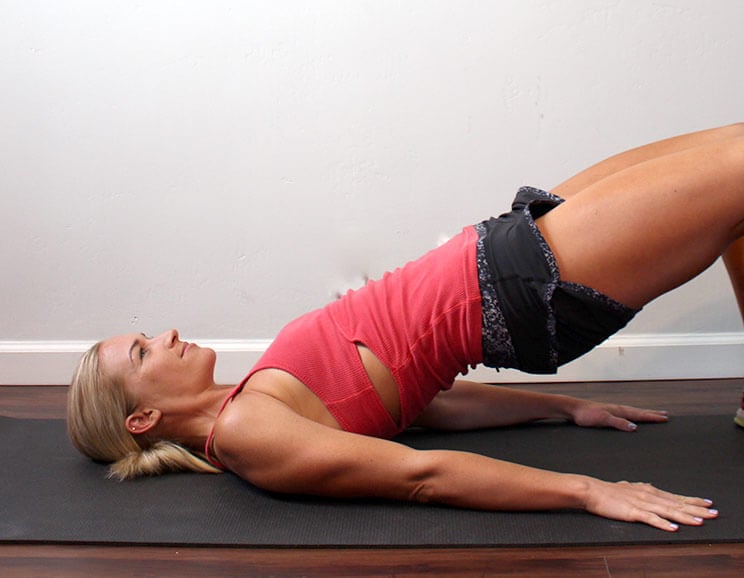
Pelvic Press | Easy
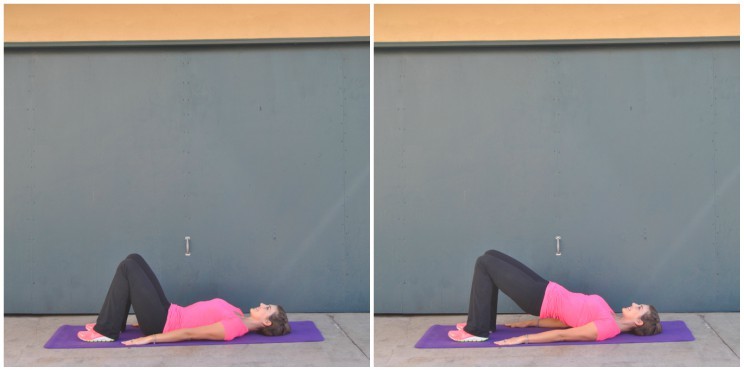
Start by lying on your back with the knees bent, and the feet in line with the sitting bones. Squeeze your backside, press into your feet, and push the hips up to the ceiling. Continue to squeeze your backside as you lower the hips down, then immediately press them back up.
Single Leg Press | Medium
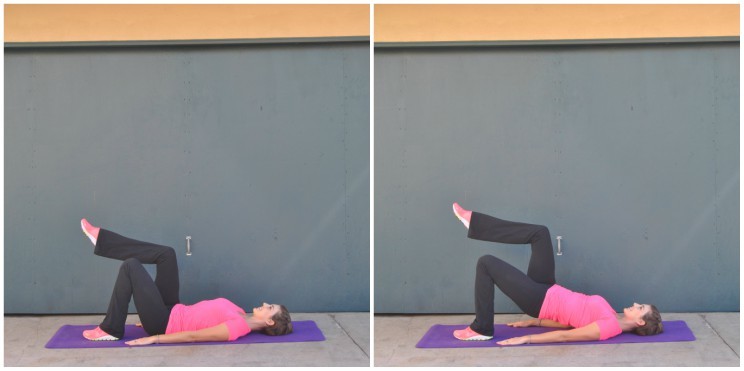
Start by lying on your back with the knees bent and hips pressing up. Lift your right knee to 90º, and keep it there. Squeeze your backside as you lower the hips down to touch the floor, and immediately press them back up. After your desired number of repetitions (8-12), switch legs.
Shoulder Bridge | Hard
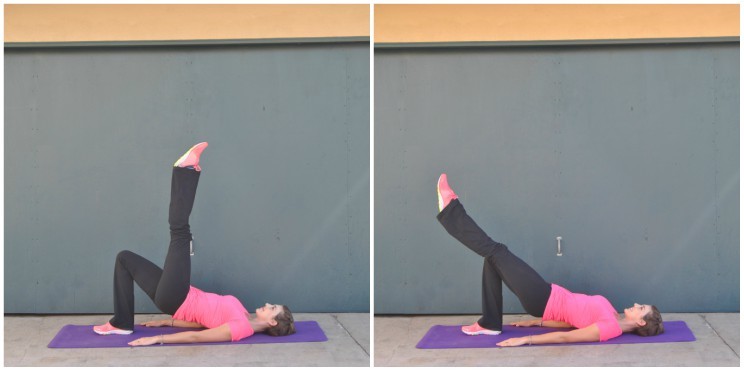
Start at the top of the single-leg pelvic press. The hips are lifted, and the right foot is lifted to 90º. Extend the right leg to the ceiling. Then lower and lift the right leg, keeping the knee straight. Note: the leg only lowers until it’s in line with the left thigh. After your desired number of repetitions (8-12), switch legs.
Single Leg Romanian Deadlift | Goal: 10 reps per set
Benefit of the Single Leg RDL
Single-limb movements are more challenging than bilateral movements, which makes them effective for correcting muscle imbalances and improving joint stability.
I’m a big fan of single-leg work, which I’ve written about more here. This exercise plays on the traditional deadlift by replacing loaded-weight with gravity-weight. Meanwhile, it develops muscles across the entire posterior chain (the glutes, hamstrings, spinal erectors, lats, and traps).
Technique Tips
Of course, this exercise requires balance to be effective. The regression (known as Good Mornings) targets the same muscles through the backside and core. The key to firing up your muscles without resistance is to contract them before moving, so imagine that you’re actually lifting something heavy.
Good Mornings | Easy
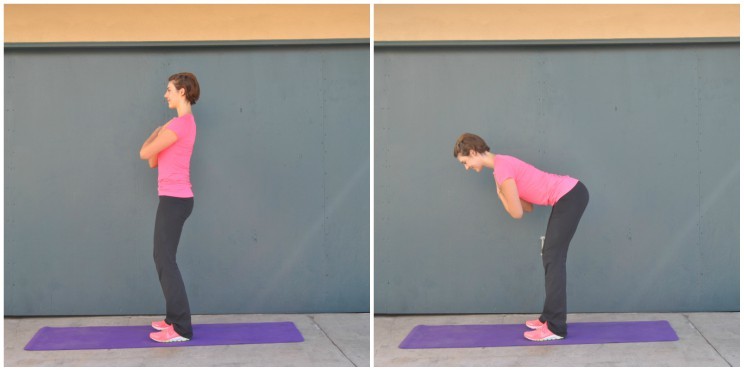
Start standing with the feet under the hips in parallel, and the hands crossed at the chest. Engage the abdominals, and hinge at the hips to lean the body forward and reach the hips behind you. Squeeze the backs of both legs to return to standing.
Single Leg Russian Deadlift | Medium
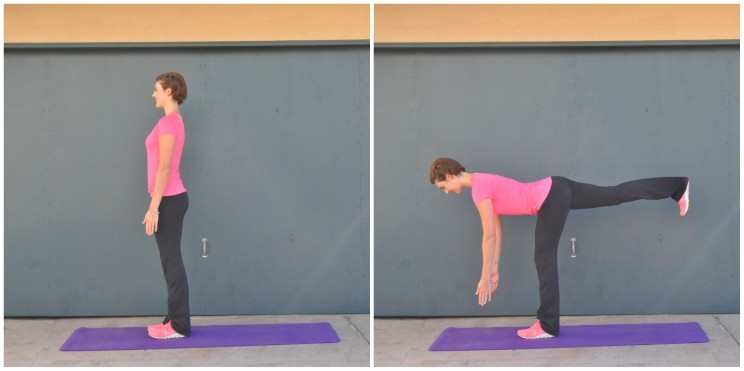
Start standing with the feet under the hips in parallel, and the abdominals engaged. Hinge at the hips to lean the body forward, and extend the right leg behind you. (The left knee has a micro-bend.) Squeeze the left glute and hamstring to return to standing (with the feet side-by-side).
RDL Knee Tuck | Hard
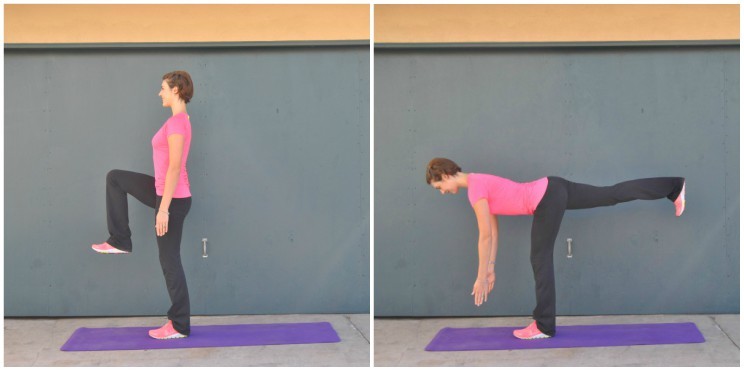
Start standing with the feet under the hips in parallel. Engage the abdominals, and lift the right knee to 90º. To lean the body forward and extend the right leg behind you, hinge at the hips (creating a micro-bend in the left knee). Squeeze the left glute and hamstring to return to standing, with the right knee lifted.
Plank | Goal: Hold for 60 sec
Benefit of Planks
Planks act as a full-body exercise, strengthening the deep core muscles (as well as the arms, legs, and shoulders). Many trainers (myself included) will choose to do planks (instead of crunches) as their primary ab exercise.
Technique Tips
The most common problems that I see in people doing planks is dipping into the low back. In other words, their core isn’t properly engaged. Or they drop between their shoulder blades. That means that the mid-back isn’t firing, so their hands are taking too much weight. Even if you’re an advanced planker, I recommend warming up with a few rounds of the regression.
Knee Hovers | Easy
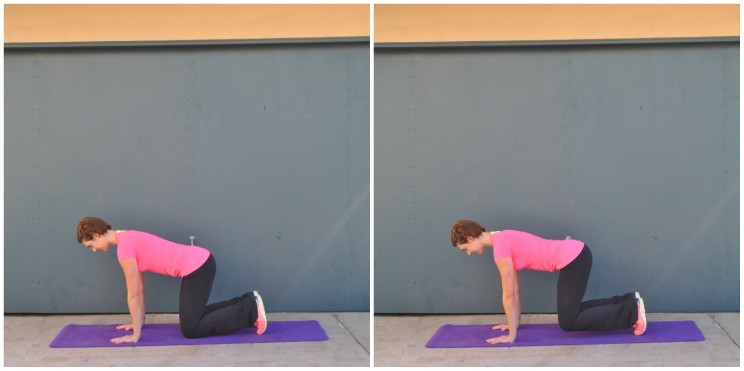
Start on all fours, with the wrists under the elbows and knees under the hips. Tuck your toes, and firmly pull your navel towards your spine. EXHALE while lifting the knees to hover one inch from the floor. Hold for a full inhale. Exhale before lowering the knees. Repeat.
Plank | Medium

Start on all fours, with the wrists under the elbows and knees under the hips. Firmly pull your navel towards your spine. Then step back one foot at a time, until your body is in one long line (from head to heels). Hold this position, inhaling through your nose and exhaling through your mouth (deepening the abdominal connection and keeping a flat back). (I’ve also written about how to do the perfect plank.)
Airplane | Hard
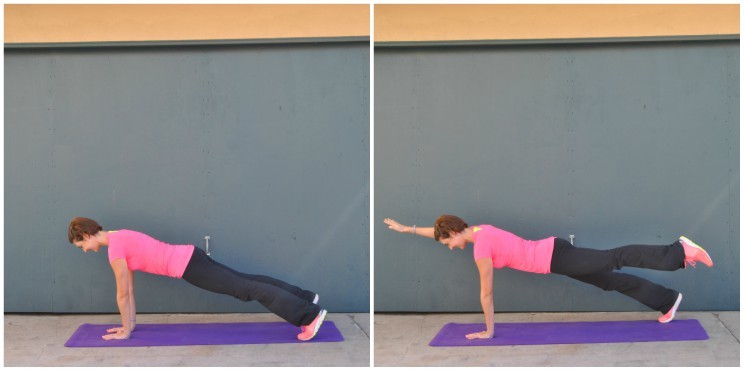
Start in plank position, with the feet slightly wider than the hips and the hands under the chest. Lift the left toes away from the floor as you reach the right arm forward. Keep the pelvis and spine completely still, and hold for a breath. Then lower the limbs and alternate sides.
Side Plank | Goal: Hold for 60 sec
Benefit of Side Planks
Similar to the full plank, the side plank works the entire body with a specific focus on the lateral muscles. They include the obliques, the serratus anterior (the muscles that help move the shoulders and arms), and even the rectus femoris (at the side of the thighs). Strengthening the side of the body is often forgotten during workouts. But bodyweight training makes it easy to rectify that. A functional body is well-conditioned in all directions, which is why you should train the front, back, and sides.
Technique Tip
If you experience wrist pain, drop to your forearm, and keep the elbow underneath the shoulder.
Kneeling Hip Lifts | Easy
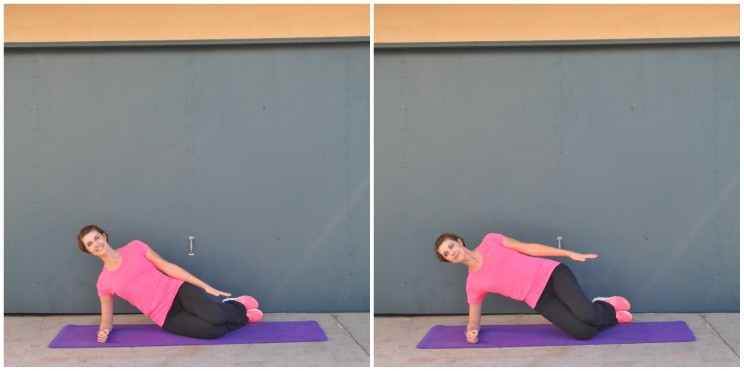
Start facing sideways, with your right forearm, hip and knee on the floor. EXHALE, lifting the hips. Keep the shoulder over the forearm and the pelvis square. INHALE, lowering the hips. Switch sides after your desired number of repetitions.
Side Plank | Medium
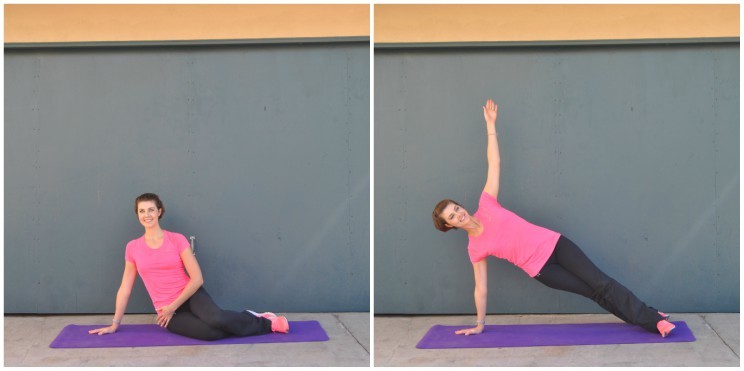
Start facing sideways. Keep your right hand on the floor, wrist under the shoulder, right hip on the floor, and knees bent. Engage your right obliques (the side abdominals). Lift the hips up, keeping the shoulder over the wrist and the pelvis square. Hold this position, inhaling through your nose, exhaling through your mouth, and deepening the abdominal connection. Repeat on your left side.
Tip: If you experience wrist pain, drop to your forearm, keeping the elbow underneath the shoulder.
Side Star Crunch | Hard
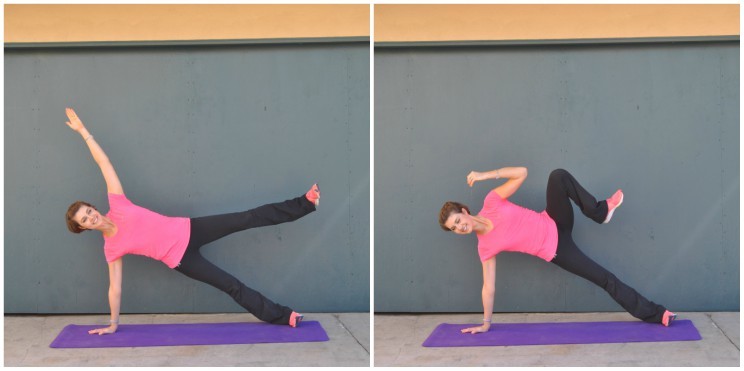
Start in side plank, with the RIGHT hand and foot on the floor. Hover the LEFT leg up, and reach the left arm overhead. EXHALE as you draw the left elbow and knee towards each other. INHALE to return to the star shape. Switch sides after your desired number of repetitions.
Mountain Climbers | Goal: 50 reps per set
Benefit of Mountain Climbers
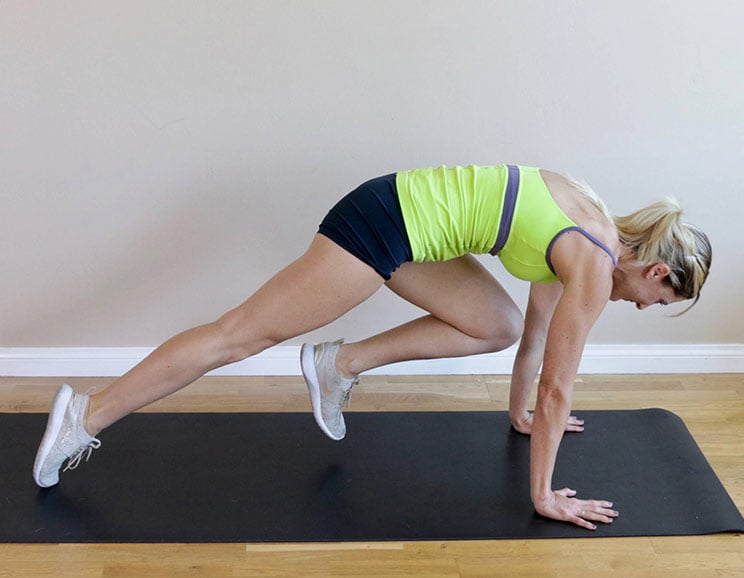
Mountain climbers have seen a great come-back in the aerobic arena, and for good reason. Similar to planks, these bodyweight exercises strengthen the whole body. They has the added benefit of elevating the heartrate, challenging stability, and deepening pressure against the low abdominals.
Technique Tips
A common error is forgetting that the foundation of mountain climbers is the plank pose. If your form falters, take the regression below, or reduce your speed. The advanced variation of this exercise requires more lift and press from the abdominals and arms, and more engagement through the front of the thighs.
Elevated Hands | Easy

Place your hands on an elevated surface (such as a bench or table). EXHALE as you draw your right knee to the chest. INHALE and place the foot back down. EXHALE as the left knee comes to the chest. INHALE and place the foot down. Continue to alternate for your desired number of repetitions.
Mountain Climber | Medium

Start in your basic plank position. EXHALE as you draw your right knee to the chest, INHALE and place the foot back down. EXHALE as the left knee comes to the chest. INHALE and place the foot down. Continue to alternate for your desired number of repetitions.
Front Toe Tap | Hard

Start in your basic plank position. EXHALE as you draw your right knee to the chest. Touch the right foot down under the chest. Take a quick INHALE before EXHALING. Then hop-switch the left and right feet. Continue to alternate for your desired number of repetitions.
Wide-Grip Push-Ups | Goal: 15 reps per set
Benefit of Wide-Grip Push-Ups
Push-ups strengthen the arms, chest, back and abdominals. The beauty of this exercise is that they can be done anywhere, anytime (with no props or workout clothing needed). Pressing your own bodyweight up and down is a exercise for strength and endurance, and it’s a compound exercise (or multi-joint exercise).
Kneeling Push-Up | Easy
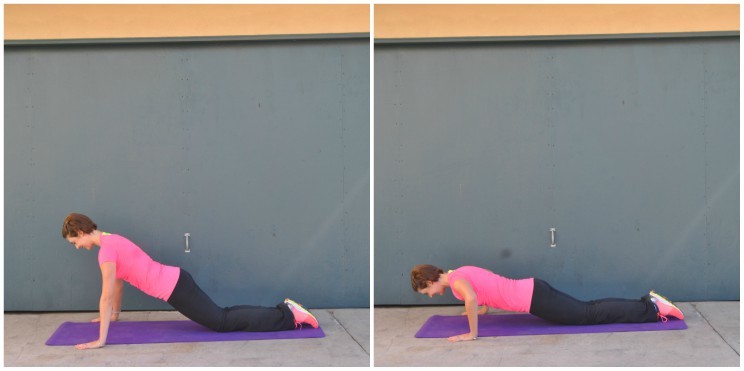
Start in your kneeling plank position with the hands wider than the chest, the knees down, and the hip crease open. EXHALE, engage your abs, bend the elbows to the side, and lower the whole torso towards the floor. INHALE and press back up.
Wide Push-Up | Medium
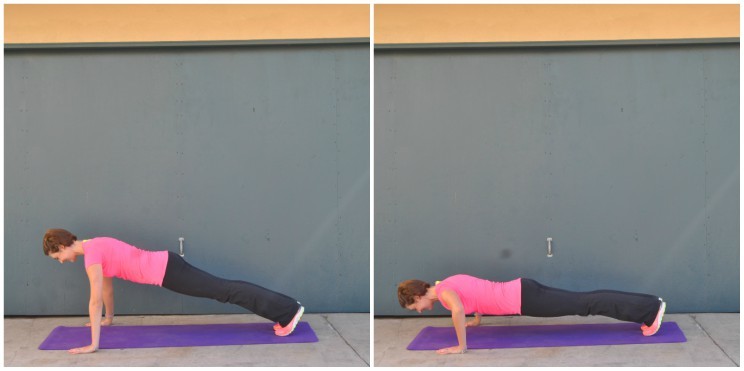
Start in your plank position with the hands wider than the chest. EXHALE, engage your abs, squeeze your glutes, bend the elbows to the side, and lower the whole torso towards the floor. INHALE and press back up.
Single Leg Push-Up | Hard
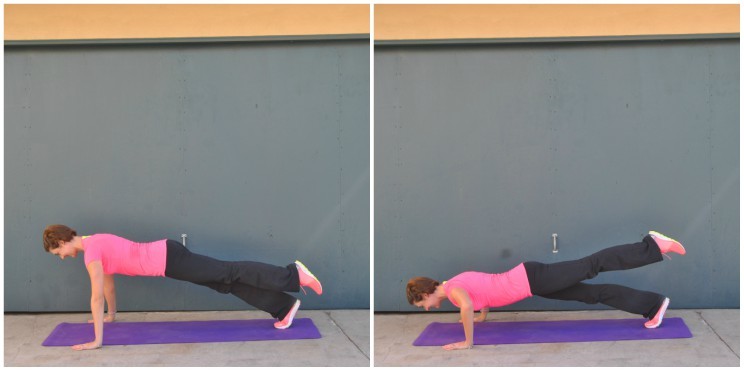
Start in your plank position with the hands wider than the chest. Engage your abs, squeeze your glutes, and lift up on one leg. The leg doesn’t have to be high. Try to keep your hips and shoulders square. Perform your set of pushups with the leg lifted during the entire set. Switch sides.
Narrow Push-Ups | Goal: 15 reps per set
Benefit of Narrow Pushups
If you simply move the hand position from wide to narrow, it changes the experience and purpose of the pushup. Narrow pushups target the triceps at the backs of the upper arm. These triceps tend to be weaker than the biceps and chest muscles, which are primarily used in the wide-grip position.
Technique Tips
Many people find that the narrow pushup is more challenging that the wide-grip (myself included!). Fortunately, research suggests that taking the regression and dropping to your knees actually doesn’t decrease the effectiveness of this exercise (3).
Kneeling Push-Up | Easy
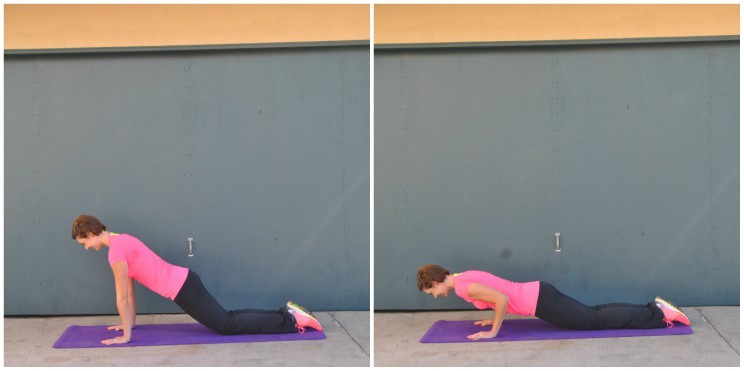
Start in your kneeling plank position with the hands directly under the shoulders, the elbows tucked into the ribs, and the knees down. EXHALE, engage your abs, squeeze your glutes, bend the elbows to the side, and lower the whole torso towards the floor. INHALE and press back up.
Narrow Push-Up | Medium
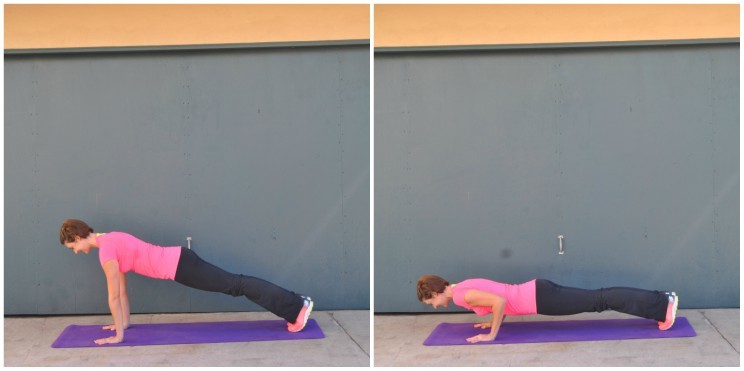
Start in your plank position with the hands directly under the shoulders and the elbows tucked into the ribs. EXHALE, engage your abs, squeeze your glutes, bend the elbows to the side, and lower the whole torso towards the floor. INHALE and press back up.
Diamond Grip | Hard
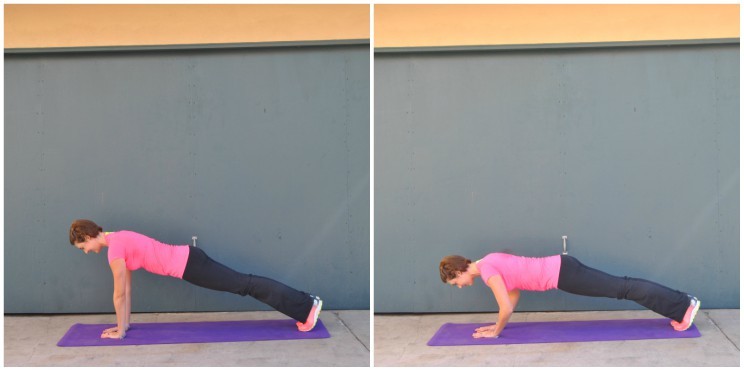
To make this an even more intense exercise for the triceps, place your hands together in a diamond position (with your pointer fingers touching and your thumbs touching underneath your chest). Repeat your pushups from this position.
Full Sit-Up | Goal: 10-15 reps per set
Benefit of the Full Sit-Up
I view the full sit-up as an exercise in spinal mobility (as much as a six-pack workout). The ability to segment the spine by rolling up and down is crucial to spinal health. The six-pack muscles and deeper core are recruited to perform this exercise, as well some work in the hip flexors.
Technique Tips
Since your main resistance is gravity, you can increase the challenge by moving slowly and reducing the need for momentum.
Bent Knee Rollback | Easy

Start seated with the knees bent and the hands holding the back of the thighs. EXHALE, use your arms as support, and slowly roll all the way down (until you’re lying on your back). INHALE and pause at the bottom. EXHALE to roll back up to a seated position (with the hands on the thighs).
Full Sit-Up | Medium

Start by lying on your back with your knees bent and feet flat on the floor. Make sure that your heels aren’t too close to your backside. EXHALE as you lift the head and chest, and roll all the way up the spine to a seated position. INHALE at the top, and EXHALE to roll back down.
Single Leg | Hard

Start by lying on your back. Keep your knees bent and LEFT foot flat on the floor. Extend the RIGHT leg, so that the thighs are touching. EXHALE as you lift the head and chest, and roll all the way up the spine to a seated position. INHALE at the top, and EXHALE to roll back down. Repeat your desired number of repetitions on this leg. Then switch sides.
(Your Next Workout: Dirty Dozen Bodyweight Workout)



 Homemade Sour Strawberry Gummies


Show Comments